For Model: Echo-PT
Echo-PT Quick Start Guide
Please follow this guide to get your new Echo-PT up and running!
Having trouble or can’t find the information you’re looking for? Please contact us.

IMPORTANT! The Echo-PT cannot be controlled from the standard “DynaMount” app, rather it requires the separate “DynaMount Broadcast” app. The DynaMount Broadcast app is free and available for macOS and Windows. It is NOT yet available from the public app stores, please download directly from the links below.
- macOS:
- Download
- Latest app version: 0.1.8
- For Mac laptop/desktop computers.
- Requires macOS version 10.10+
- Windows:
- Download
- Latest app version: 0.1.8
- For Windows laptop/desktop computers.
- Requires Windows version 7+
- Download and unzip the DynaMount Broadcast app, using one of the links above
- Double-click the “DynaMount Broadcast” application icon within the folder to run it
macOS Notes:
- In macOS, if there is a warning about the app being unsigned, and it won’t let you open it:
- Close the warning
- Right-click or CTRL-click on the application icon, and select “Open” from the list
- When the warning pops up again, select the “Open Anyways” button
- There should be no warning the next time you open the app
Windows Notes:
- In Windows, if there is a warning about the app being unrecognized, and it won’t let you open it:
- Click “More Info”
- Click “Run anyway”
- There should be no warning the next time you open the app
- Note! The app requires Bonjour drivers (which are used for device discovery on the local network), if you have never before installed Bonjour on this Windows computer please follow the steps below:
- Download and install the Bonjour drivers for Windows HERE
- After installing Bonjour, close and then re-open the DynaMount app
- Open the DynaMount Broadcast app, then either log in with your existing DynaMount profile or click “Create New Profile” and follow the instructions.
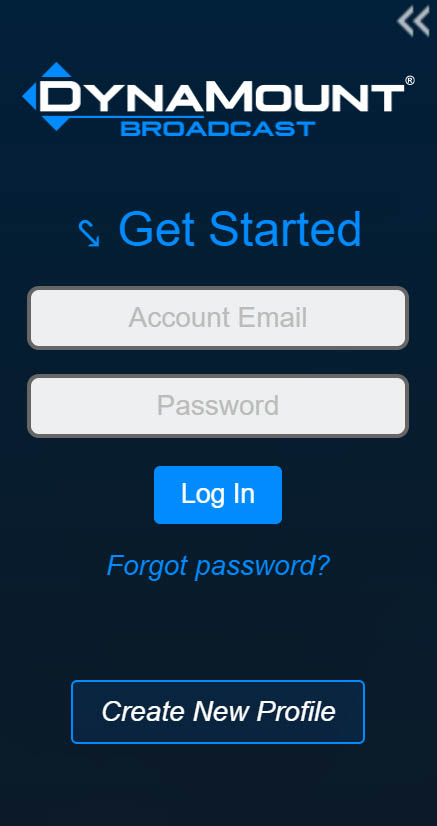
- “Role-based” email addresses such as those that start with info@, contact@, admin@, among others may see an error when trying to create a new profile (for spam blocking reasons). If you need to use a role-based email, please contact us and we will be happy to add it manually.
- Warning! Ensure that the stand will remain stable, even during motions with the full weight of the mic/payload attached. Failure to do so could result in the stand tipping over during motions causing damage to the DynaMount and/or microphone.
- Warning! Only mount the Echo-PT straight upright or upside-down, never sideways or at an angle.
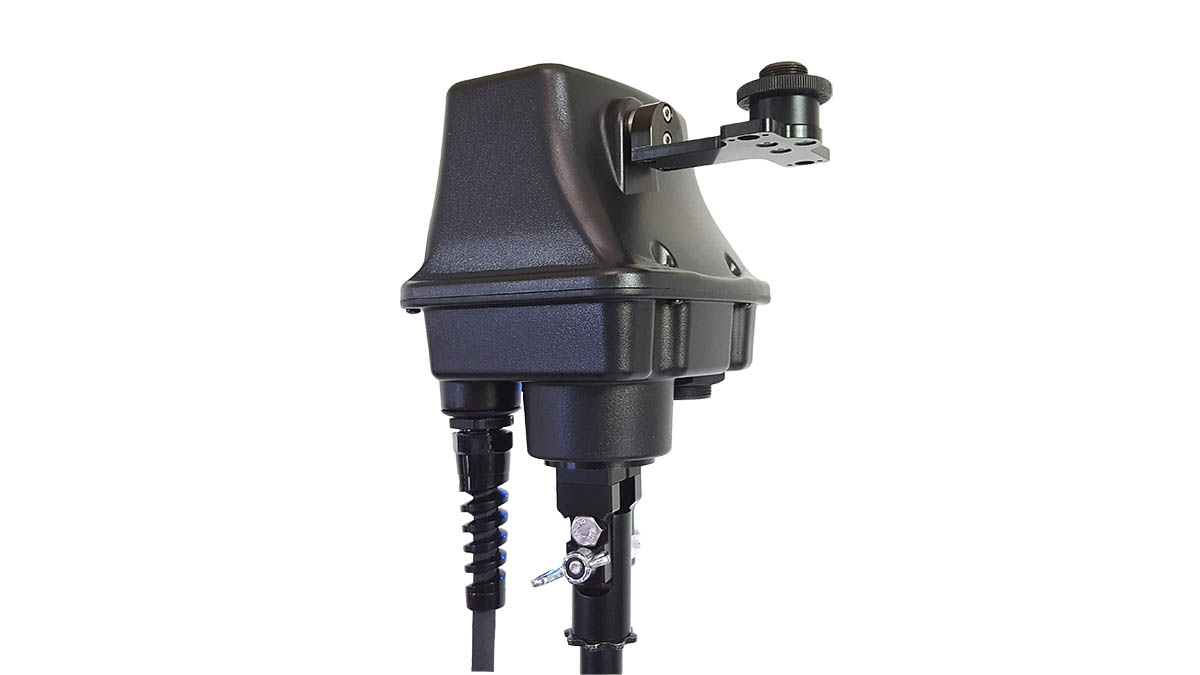
- Fully thread the included Mic Stand Adapter component onto the desired mic stand/support.
- Position the Echo-PT such that the two prongs of its base fit over the Mic Stand Adapter.
- Insert the two hex head bolts through the holes.
- Place a washer over each bolt.
- Firmly tighten a wing nut onto each bolt to finish securing the Echo-PT to the stand.
- Tip! After attaching to the stand, slowly rotate the Echo-PT by hand to line up the small notch on the Echo-PT base with the front of the unit. This will ensure that when booted up the unit is already positioned near its home/zero angle.
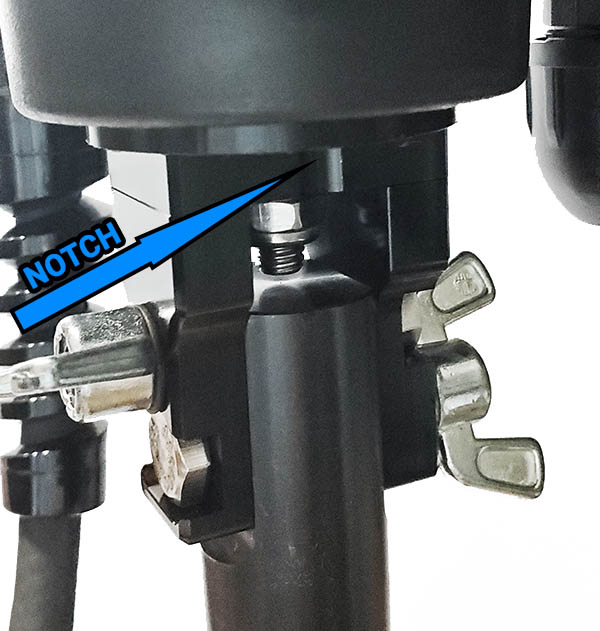
- Tip! After attaching to the stand, slowly rotate the Echo-PT by hand to line up the small notch on the Echo-PT base with the front of the unit. This will ensure that when booted up the unit is already positioned near its home/zero angle.
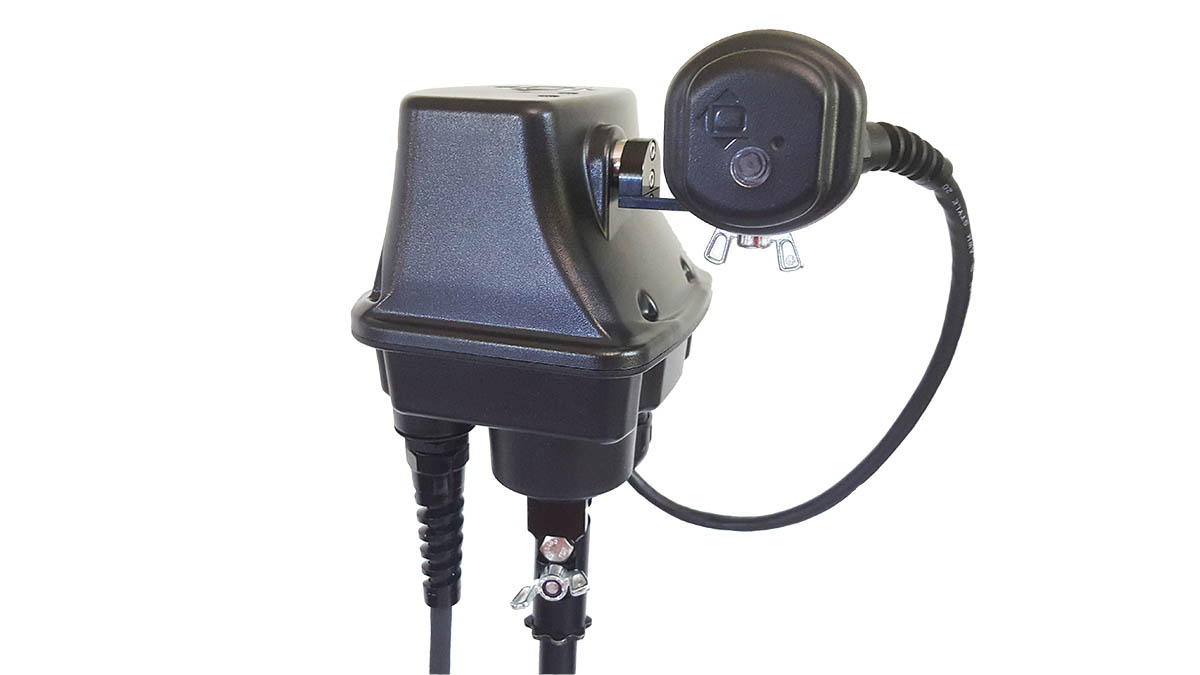
- Once the Echo-PT is securely mounted, if desired you may now attach the Camera.
- Plug the Camera cable into the receptacle on the Echo-PT and tighten the lock nut to secure.
- Line up the mounting screw and two pins on the Camera with corresponding holes in the Echo-PT tilt bracket.
- Tip! Typically the Camera will be mounted to the shorter side of the tilt bracket. Alternatively, it may be mounted upside-down to the longer side of the tilt bracket.
- Tighten a wing nut onto the Camera mounting screw to secure it.
- Warning! Only plug/unplug the Camera with the power off.
The Echo-PT receives both power and network connectivity over a standard cat6 Ethernet cable. Power over Ethernet (PoE+) is the only way to power the unit.
- Warning! Your PoE+ power sourcing equipment (typically an Ethernet switch or injector) must be rated for at least 25.5W “PoE+” (IEEE 802.3AT).
- Warning! Once the Echo-PT has been plugged in and powered up, do NOT unplug the cable to power down the unit without first sending a “shutdown” command to the unit via the app.
- Warning! The Echo-PT has a short integrated cat6 cable “tail” with a cat6 coupler plugged into the end of it. When disconnecting your cat6 cable from the unit, leave the cat6 coupler on the Echo-PT.
- Plug one end of your cat6 cable into your PoE+ power sourcing equipment
- Plug the other end of the cat6 cable into the coupler on the Echo-PT
- The LED on the unit will turn on immediately (assuming a PoE+ power source is connected)
- It will first glow white (or bluish white) for ~15s
- Then the LED may turn off for 30-45s while the unit fully boots up
- The LED will turn back on (solid green) once fully booted up and connected to your network

- Once the Echo-PT is connected to your network, A “New DynaMount Found” message will pop up in the app, and ask if you would like to claim the device. Click “Yes”.
- If the message does not show up:
- Double-check your computer is connected to the same network as the DynaMount, then try clicking the “🔍LAN” button to scan for units on the network
- If it still does not show up, check the LED on the Echo-PT to make sure it is solid green. Otherwise, the unit may not be connected to your network. LED Color Codes
- If the message does not show up:
- Give the DynaMount any name you would like, then click OK.
- You will see a new button with the assigned name appear in the “Echo-PT Devices” list
- This button will highlight blue indicating the Echo-PT is ready to control!
- Click the new unit’s button in the “Echo-PT Devices” list to open its control window
- If the Camera is connected to the Echo-PT, you will see the control gauges overlay the real-time video stream. Otherwise, without a camera the grid UI is displayed.
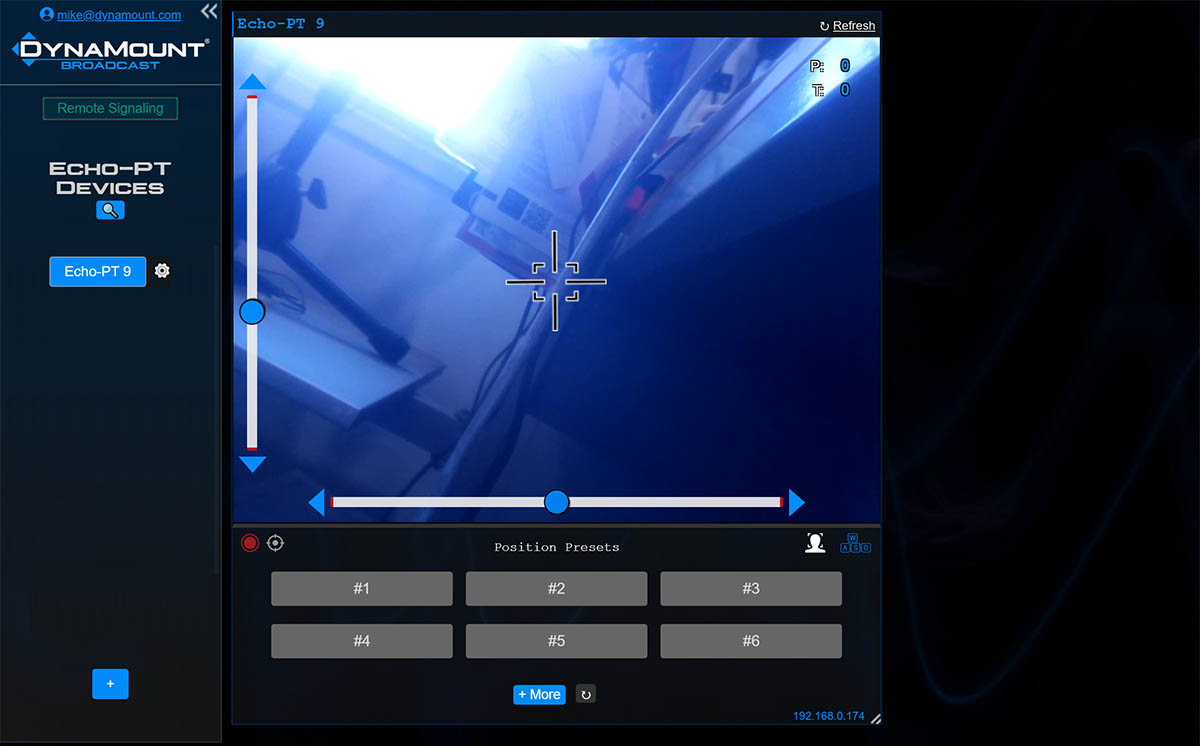
- The LED on the Echo-PT will turn blue once the control connection is established.
- Now that the unit is connected and ready, attach a microphone of your choice to the tilt bracket and secure it inline with the Echo-PT.
- Note! Use the included black “jam nut” to easily lock the mic in the desired position.
- Use a shock mount for optimal performance and isolation.
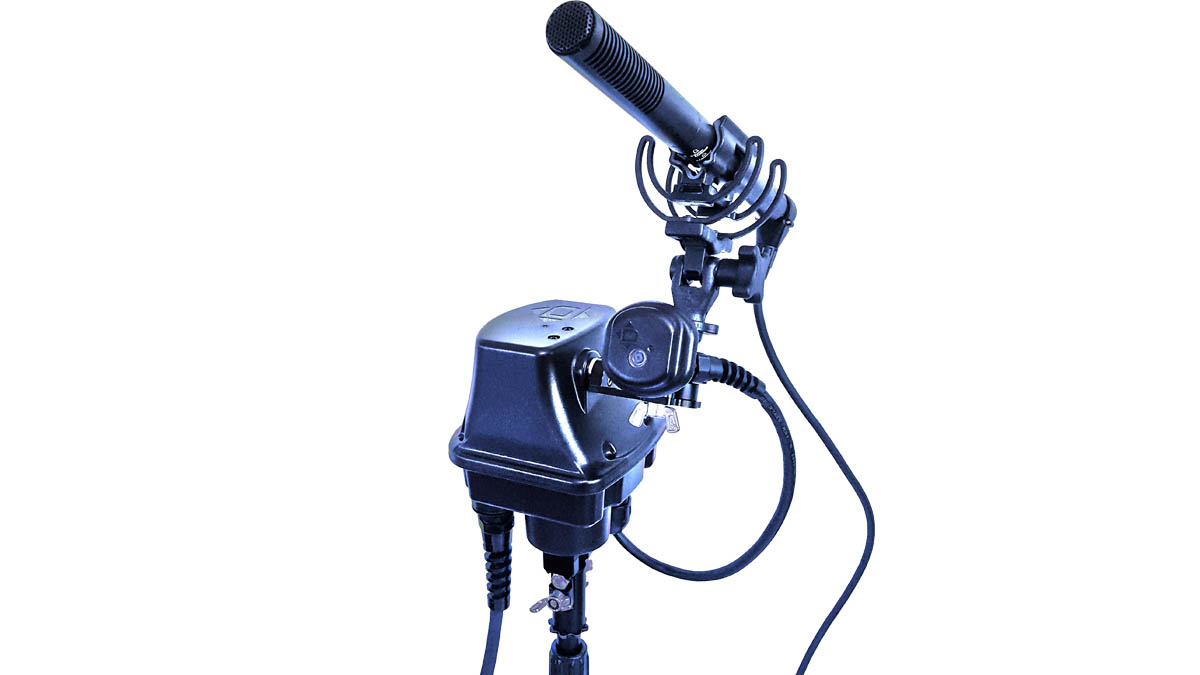
- Connect a microphone cable to the mic
- Guide both the Ethernet cable and mic cable to a safe unobstructed position
- Warning! It is recommended to give the cables slack, and then gaffer tape them to the mic stand to keep them in position and act as a strain relief.
- Warning! Be sure to leave enough slack on the cables to allow for a full 360° rotation in all possible tilt orientations.
- There are now several ways to position or steer the microphone:
- Virtual Joystick – Click and hold anywhere within the video stream or control grid and a virtual joystick will appear for real-time microphone steering.
- Tip! Adjust the speed by clicking the Device Settings icon, then see “Motion Settings”.
- Click-To-Move – Do a quick click anywhere on the video stream or control grid, and the Echo-PT will point to that position.
- Sliders – If motion only along one axis at a time is desired, use the control sliders. The DynaMount will move with you as you drag, or you can click a specific spot along the slider.
- Nudge Arrows – For fine tuning the position, click the blue triangular nudge arrows to move in one small increment at a time. The size of each nudge can be adjusted, just click the Device Settings icon, then see “Motion Settings”.
- Keyboard Hotkeys – Use the WASD keys on your keyboard for a shortcut to motions.
- Type Values Directly – If you know exactly where you want to go, simply type the position value into the corresponding text box, then hit Enter.
- Preset Buttons – To store a position for recall, click on any gray (unsaved) preset button, give it a name, and save it. Now you can precisely return to this position any time you want, simply by clicking the blue (saved) preset button.
- Ember+ Protocol – As an alternative to controlling the Echo-PT from our app, it can be controlled via the Ember+ protocol. This allows an Ember+ provider (such as an audio console) to adjust the pan, tilt, and speed of the unit. Click on Device Settings (gear icon) > Ember+ Settings > and from here this can be configured.
- Virtual Joystick – Click and hold anywhere within the video stream or control grid and a virtual joystick will appear for real-time microphone steering.