For Models: X1-R, X1, V1-R, V1
Troubleshooting
Wi-Fi Setup Issues
I can’t connect to the “DynaMount-XXXX” Wi-Fi network.
- Here are a few different things to try if you can’t get your computer or mobile device to connect to the “DynaMount-XXXX” Wi-Fi network created by your DynaMount while in Wi-Fi Setup mode (blinking blue LED):
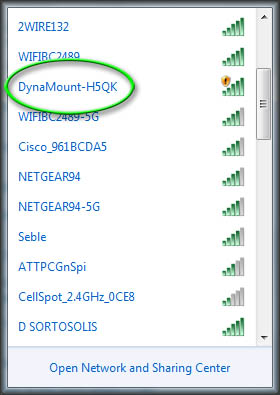
- Hit the RESET button (next to the power jack) to restart your DynaMount and try again.
- If resetting your DynaMount didn’t help: 1) completely turn off Wi-Fi on your computer or mobile device, 2) tap the RESET button on your DynaMount, 3) wait for the LED to begin blinking blue, 4) turn the Wi-Fi on your computer or mobile device back on, 5) try to connect to the “DynaMount-XXXX” network again.
- If you are using an OSX computer: from the Wi-Fi menu select “Join Other Network”, then select “Show Networks”. Make sure the “DynaMount-XXXX” network is showing up in this list. If it does show up, try to connect to it from this window. If it does not show up in this list of networks, restart your DynaMount and try again.
- If you are still unable to connect to the network, try connecting from a different computer or mobile device.
- Make sure no other devices are connected to the “DynaMount-XXXX” network (or are attempting to connect), it can only handle one connection at a time.
- If there is a nearby computer or mobile device that has the “DynaMount-XXXX” network stored as a saved network it may connect automatically without you knowing. This could be blocking you from connecting with the intended computer or mobile device.
My Wi-Fi network isn’t showing up when scanning for networks.
If you are attempting to complete the Wi-Fi Setup steps but your network isn’t showing up when you hit “Scan”, here are a few tips and things to watch out for:
- Make sure your DynaMount is positioned close to your Wi-Fi router during the setup process. If it is too far away, your network may not show up during the scan.
- If your Wi-Fi network doesn’t require a password it may not show up during the scan. Your DynaMount will only work on a network that requires a password.
- If your computer is connected to another network via Ethernet cable, this may need to be temporarily disabled/unplugged before connecting to the “DynaMount-XXXX” network for the Wi-Fi Setup process to complete successfully.
- Check if your router is using the older WEP security protocol. If it is, please see important information in “WEP security” section elsewhere in this Troubleshooting guide.
My DynaMount won’t connect to my Wi-Fi network.
- Your DynaMount should be able to connect to most typical Wi-Fi routers. If you can’t get it to connect while completing the Wi-Fi Setup steps, here are a few things to try:
- Move the DynaMount closer to your Wi-Fi router then reset the DynaMount and try again.
- If moving your DynaMount closer to the router fixes the issue, lack of Wi-Fi signal strength is the problem. Please review the tips for improving the Wi-Fi signal strength found elsewhere in the Troubleshooting guide.
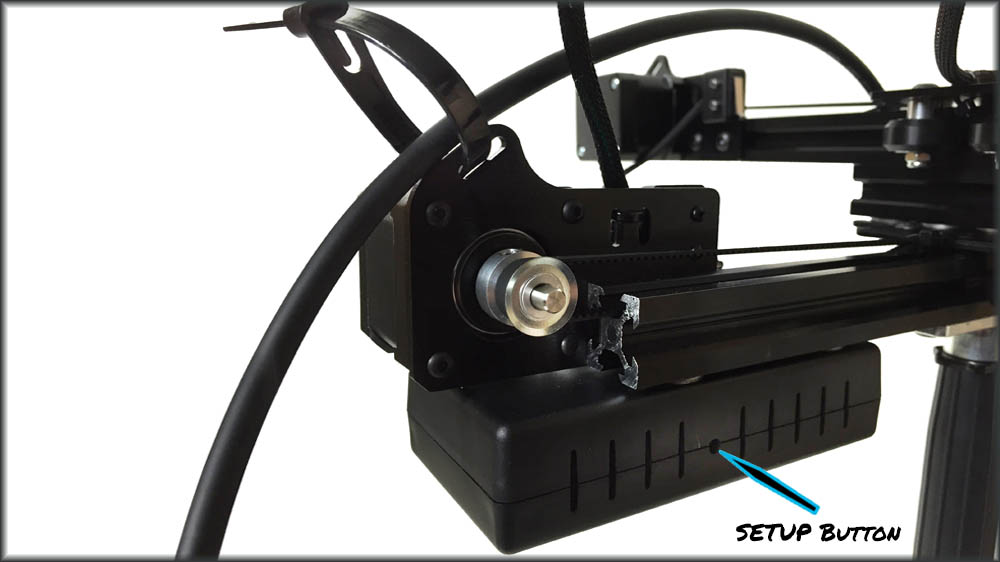
- If the LED on your DynaMount is blinking green fast, press & hold the SETUP button (see note below) on your DynaMount for 5s to clear out all Wi-Fi credentials and run through the Wi-Fi Setup steps again (double-checking that you are entering your password correctly).
- Please note, if your DynaMount is blinking green, the SETUP button may not respond right away. After you’ve held it for 5 seconds and released it, it may take up to 15 seconds to restart.
- On DynaMounts manufactured before March 15, 2016, it may be necessary to keep tapping the SETUP button repeatedly and it will eventually respond and enter Wi-Fi Setup mode after restarting. If your DynaMount has an 8-digit Serial Number (e.g. “A0316000”), then it was made after March 15, 2016, and you can ignore this message.
- Still not connecting? Check if your router uses the WEP security protocol (you can usually find this info by looking at the network details from your computer). If it uses WEP, please see important connection information in the “WEP security” section elsewhere in this Troubleshooting guide.
- Try restarting your Wi-Fi router. Then restart your DynaMount and complete the Wi-Fi Setup steps again.
- Try connecting to a different Wi-Fi router.
IMPORTANT! Please note the location of the SETUP button in the photo below. Take care to not confuse this with the RESET button, which is right next to the DC power jack.
Connecting to a router with WEP security.
Your DynaMount can connect to a Wi-Fi router that uses the older WEP security protocol, it just takes a couple extra steps.
If possible, the best solution may be to update your router’s security protocol to WPA or WPA2. They are newer and more secure, in addition to simplifying the connection with your DynaMount.
Connecting to a Wi-Fi router with WEP security:
During the Wi-Fi Setup process, when entering your Wi-Fi password/key on the DynaMount “Wi-Fi Configuration” screen, there are four extra digits you need to apply to the beginning of your password. In addition, your password must be converted to hexidecimal.
Combined, your password/key entry will contain:
- The index of the WEP key (0-3).*
- The length of the key, typically 5 bytes
- The password/key itself (converted to hex format)
Example 1:
If your Wi-Fi password is “apple” (without the quotes):
- We must first convert “apple” to Hexadecimal. (here is an online converter)
- In the online converter, type “apple” in the box where it says “Text (ASCII/ANSI)”, hit Convert, and then copy what it says from the “Hexadecimal” box.
- Paste it into any text editor (Notepad, TextEdit, etc)
- Remove all spaces from the pasted value, and convert any letters to uppercase
- We are left with: 6170706C65
- To the beginning of that we need to add two digits representing the length of the key (in bytes). Standard 64-bit WEP uses a 40 bit key, which is 5 bytes, so we need to add “05” to the beginning giving us: 056170706C65
- Now, to the beginning of all that we need to add two digits representing the key index. You should see the index listed if you look at the network details from your computer.* In our case the index is 0 so we add “00” (the only other possible values are 01, 02, 03). Adding “00” to the beginning gives us: 00056170706C65
So, the actual value typed in for the password “apple” with index 0 is: 00056170706C65
Example 2:
If your Wi-Fi password is “echos” (without the quotes):
- We must first convert “echos” to Hexadecimal. (here is an online converter)
- In the online converter, type “echos” in the box where it says “Text (ASCII/ANSI)”, hit Convert, and then copy what it says from the “Hexadecimal” box.
- Paste it into any text editor (Notepad, TextEdit, etc)
- Remove all spaces from the pasted value, and convert any letters to uppercase
- We are left with: 6563686F73
- To the beginning of that we need to add two digits representing the length of the key (in bytes). Standard 64-bit WEP uses a 40 bit key, which is 5 bytes, so we need to add “05” to the beginning giving us: 056563686F73
- Now, to the beginning of all that we need to add two digits representing the key index. You should see the index listed if you look at the network details from your computer.* In our case the index is 1 so we add “01” (the only other possible values are 00, 02, 03). Adding “01” to the beginning gives us: 01056563686F73
So, the actual value typed in for the password “echos” with index 1 is: 01056563686F73
*The only possible values to enter for the index are “00”, “01”, “02”, or “03”. Note that it is possible when looking at your network details that the index may be labelled on a 1-4 scale, whereas what is needed here is a 0-3 scale. If this is the case, just subtract 1. For example, if the index is listed as 4 subtract one to get 3, and so “03” would be used for the index value.
I want to improve the Wi-Fi signal strength where my DynaMount is set up.
There are several options for improving the Wi-Fi signal strength in the area you plan to use your DynaMount. Here are a few things to try:
- The simplest thing is to physically move your Wi-Fi router. In many situations, the router is located right near your computer but far from where the DynaMount will be. Try moving the router to a location further from your computer but closer to your DynaMount.
- You can use a Wi-Fi “range extender” (see important information in “range extender” section elsewhere in this Troubleshooting guide).
- Similar to range extenders, it is possible to connect a second Wi-Fi router to your primary Wi-Fi router (typically with an Ethernet cable) to extend the range of the network. Essentially the primary router can be configured to function as the DHCP server (assigning IP addresses) and the secondary router setup simply as an access point (AP) with all DHCP turned off. The exact process will vary depending on which routers you are using, please review instructions for connecting multiple routers provided by the manufacturer(s) of your Wi-Fi routers.
- To improve range you could always invest in a new high-end Wi-Fi router. One we have used with much success is the ASUS RT-AC68U, though there are several great options available.
- For more advanced options, contact an IT professional.
How can I look up my DynaMount’s MAC address?
When setting up your DynaMount to work on more complex networks (across subnets, corporate networks, etc.) it may be helpful to know your DynaMount’s MAC (Media Access Control) address.
If the DynaMount is already connected to your Wi-Fi network, the easiest method for looking up the DynaMount’s MAC address may be to open your Wi-Fi router’s admin panel. Where the “Connected Devices” are listed, locate the DynaMount and it will likely display the MAC address here. (In the Connected Devices list, look for a device with “Broadcom”, “Universal Scientific Industrial” or something similar in its name, this is your DynaMount).
Otherwise, here are the steps to determine the MAC address:
- Power up your DynaMount.
- Once it is in Wi-Fi Setup mode (blinking blue LED), connect to the “DynaMount-XXXX” Wi-Fi network using your computer.
- Once connected to “DynaMount-XXXX”, do one of the following depending on your computer system:
OSX Computers
- Option-Click on the Wi-Fi icon in the top bar of your computer screen
- It should list details of the access point you are connected to (which is the DynaMount)
- Where it says BSSID, this is the MAC address of the DynaMount
Windows or OSX Computers
- Open up your Command Prompt (Windows) or your Terminal (OSX)
- Type in: arp -a | grep 192.168.0.1
- It may only take a few seconds, but possibly up to 1 minute or more for response
- It should then list a few details including the MAC address of the DynaMount
Network Issues
I am trying to use a Wi-Fi “range extender” with my DynaMount.
There are products out there called Wi-Fi “range extenders” that can be great tools for controlling your DynaMounts from greater distances than what’s possible with a single router. However, special care must be taken in how they are configured.
The Problem With Range Extenders
In most cases, what is desired is having a computer connected to the primary Wi-Fi router and the DynaMount farther away and connected to the range extender. The problem is, most off-the-shelf range extenders are fake repeaters: in their default settings they function as their own DHCP server (assigning IP addresses) rather than leaving this for the primary router to handle. This puts them (and all devices connected to them) on a different subnet from that of the primary router. With this type of setup, both the computer and DynaMount would have to be connected directly to the range extender for communication to work, which may defeat the purpose of using the range extender.
The Solution
To achieve the desired functionality (computer connected to router, DynaMount connected to range extender), your primary Wi-Fi router must be configured to function as the only DHCP server. This typically requires the range extender to have all DHCP turned off and to be connected via Ethernet cable to your primary router. So make sure you get a range extender with an ethernet connection available. It is also recommended to assign a different network name and/or password to your range extender versus the primary router to ensure the DynaMount doesn’t still inadvertently connect to the farther away router. Please review information from the manufacturer of your specific range extender for instructions on configuring these settings.
Some of our customers have highly recommended the Ubiquiti Wi-Fi System as a great option. If you find any others that work well for you please let us know so we can share the info!
I am trying to use a “mesh network” with my DynaMount.
Sometimes it is desirable to create a network in your studio/home that consists of several wireless Access Points (APs) or nodes spread around the building, instead of a single Wi-Fi router. This setup is known as a “mesh network” and can help for example with ensuring a strong signal even in far corners of the building, but there are potential issues to be aware of when trying to control a DynaMount over Wi-Fi on a mesh network like this.
NOTE: A true “mesh network” is not the same as simply plugging a Wi-Fi “range extender” into your router. For info specifically related to “range extenders” please see the section on this elsewhere on this page.
The Problem When Using A Mesh Network
In most cases, every wireless Access Point in a mesh network uses the same Wi-Fi network name and password. This allows some devices like laptops and phones to “hop” from node to node selecting the one with the strongest signal at a given moment. Unfortunately, the processor running on a DynaMount is not nearly as powerful as the one in for example an iPhone, and the DynaMount is not designed to hop across APs like this.
The problem is that every time the DynaMount is booted up, it will connect with only the *first* AP it encounters with the configured network name/password. If there is more than one AP within range (for example one nearby with strong signal and another farther away with weak signal), it is impossible to know which AP the DynaMount will connect with when it boots up! It may connect with the closer AP on one boot and have a nice strong connection, but then the next boot it may connect with the farther AP with weak signal which may lead to dropped connections and timeout errors in the app.
The Solution
There are a few potential solutions we recommend trying:
- If possible, you can consider using a hard-wired Ethernet connection to your DynaMount, instead of Wi-Fi. This feature is only available on Gen2 DynaMount models, but completely avoids any issues with wireless signal strength, and the Ethernet cable can be up to 100m long.
- You can try placing one AP close to the DynaMount, and ensure all other APs are placed much farther away, out of range. It is impossible to say an exact distance because it depends on wall thickness, etc. But the goal is ensuring each time the DynaMount boots up there is only a single AP within range, so it always connects with this one for a strong signal.
- Depending on your particular modem or primary router (the gateway to the broader internet for your entire mesh network), some allow you to configure a different network name/password for the primary router than the rest of the mesh network. For example, you could have the primary router located near the DynaMount with network name My_Primary_Network while all the mesh APs are configured with a different network name My_Mesh_Network. The DynaMount could be configured to connect only to the primary router, ensuring a strong signal, while leaving the rest of your mesh network intact.
Connection Issues
My DynaMount is not responding when I try to control it.
Is the LED blinking blue?
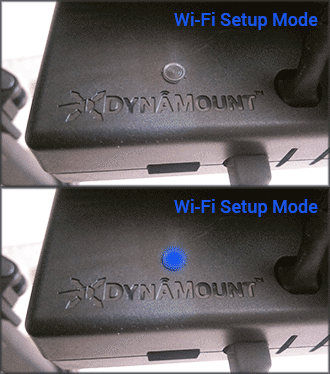
A blinking blue LED means your DynaMount is in “Wi-Fi Setup” mode. Before your DynaMount can be controlled over Wi-Fi it must be configured to connect with your home/studio Wi-Fi network. Please review our Wi-Fi Setup Guide for instructions to get connected.
Is the LED blinking green fast?
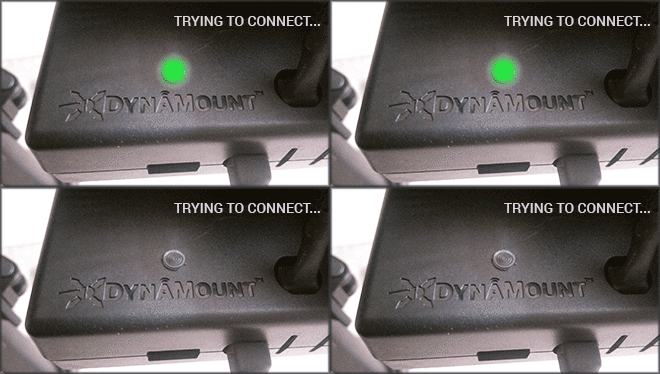
This means it is trying to connect to your Wi-Fi network. Your DynaMount will not respond when the LED is blinking green fast.
If it continues blinking green for a long time it may be having trouble connecting. In this case, please review the troubleshooting tips for “My DynaMount won’t connect to my Wi-Fi network” found elsewhere in this guide.
Is the LED “breathing” green slowly?
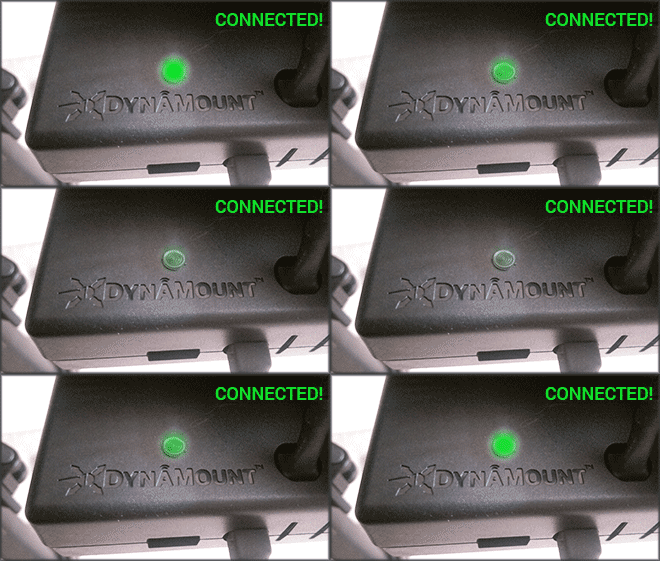
Here are some steps to try if your DynaMount is “breathing” green (connected to Wi-Fi) but not responding when you try to control it from one of the apps:
- Make sure that your controlling device (computer, mobile phone, etc.) is connected to the same Wi-Fi network as your DynaMount.
- Click on the “Home” icon in the top left of the app window, then click on your DynaMount’s name in the “Your Devices” list and try again.
- If you are using something like a Wi-Fi “range extender”, special care must be taken in how it is set up to work with your DynaMount. Please review the “range extender” tips found elsewhere in this Troubleshooting guide.
- Try moving the DynaMount closer to your Wi-Fi router and try again. You may want to move your Wi-Fi router to be closer to the location where you plan on placing your DynaMount. Even if the LED is breathing green, it’s possible it could be right on the limits of its range and having trouble receiving commands.
- If moving your DynaMount closer to the router fixes the issue, please review the tips for improving Wi-Fi signal strength found elsewhere in the Troubleshooting guide.
- If it is still not responding, check to make sure that you don’t have any client isolation firewalls setup on your network (this is common on guest networks used at some businesses, airports, etc.). Look through your router’s settings for something called “Peer To Peer Blocking”, “Guest Network”, “AP Isolation”, “WLAN Partition” or similar and try disabling this setting.
- Try running through the Wi-Fi Setup steps again to connect your DynaMount to a different Wi-Fi router.
My DynaMount’s connection keeps dropping suddenly.
If your DynaMount is unable to stay connected to your network for an extended period of time and/or the connection keeps dropping suddenly, here are the three most common culprits:
- Wi-Fi signal strength. If the Wi-Fi router is close enough where the DynaMount is able to connect, but far enough where the signal is weak, this can lead to dropped connections.
- Mesh networks. If you are using a wireless mesh network, it can vary from boot to boot which Access Point the DynaMount happens to connect with, which can lead to a poor connection randomly on some boots. Please see the specific section on “mesh networks” elsewhere on this page.
- Dual-band issue when some Wi-Fi routers share the exact same network name/password for both bands 2.4GHz and 5GHz. See below for details.
The Problem When Sharing A Single Network Name/Password Across Both Bands (2.4GHz & 5GHz) Of A Wi-Fi Router
Most modern routers are dual-band meaning they have both 5GHz and 2.4GHz frequency bands. DynaMounts will only work on 2.4GHz. Typically these routers come set where each band has a slightly different network name like “My-Network” and “My-Network-5G” so it’s easy to just connect the DynaMount to the regular/2.4GHz band. But sometimes if both the 2.4GHz and 5GHz networks have the same network name and password then the router will try to automatically bump devices up to the 5GHz band if it thinks it will speed things up. When it tries to bump up the DynaMount to 5GHz it will mess up the connection, and possibly cause the DynaMount to restart.
The solution is simply to make sure your 2.4Ghz and 5Ghz networks are set to have different names and/or passwords.
Hardware
A sliding platform on my DynaMount feels loose (wiggles).
Each sliding platform on your DynaMount rolls along the rail using four wheels. Two of these wheels use “eccentric spacers” which can be adjusted to remove any wiggle or play between the sliding platform and the rail. Here are the steps to adjust them:
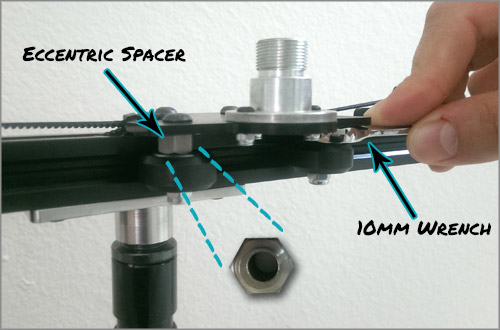
- You will need a 10mm wrench. These can be purchased from most local hardware stores and online tool retailers.
- Each eccentric spacer has a small visible notch on one side.
- To tighten, use the wrench to rotate the eccentric spacer so that the notch moves towards the rail. (Notch facing the rail = maximum tightness)
- Adjust each side evenly in small increments and just enough so that it no longer wiggles, but no tighter.
- If adjustments made to the eccentric spacers don’t seem to be lasting, it may also be necessary to tighten the screws that hold the wheels onto the sliding platform.
The motors are getting quite warm, is this normal?
It is normal for the motors to get very warm. They typically operate around 104-122°F (40-50°C), though depending on several factors this may fluctuate. While it may be counter-intuitive, the motors use a similar amount of power when stationary as when moving. This is necessary to achieve the required “holding torque” to keep your microphone locked in position. Motors getting warm does not affect the functionality of the device. Caution should be used when handling the device while plugged in and for a short period after being powered off, although in most circumstances it is easy to carry the device without directly touching any motor.
User Profile
How do I remove a DynaMount from my user profile?
To remove a DynaMount from your profile, in the app go to Device Settings (gear icon) > General Settings > scroll down part way and you will see the “Delete Device” button.